


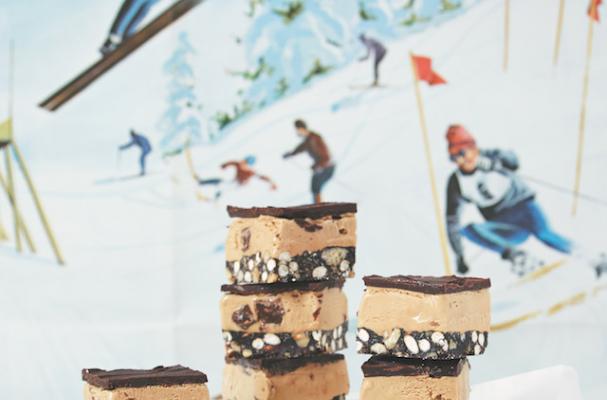
Even though the weather outside is frightful, ice cream in winter is still delightful. These nanaimo ice cream bars from Baked Occasions are about as good as it gets. A chewy pretzel chocolate cookie is the base for rich homemade ice cream and fudge topping. One bite and you'll be hooked. Learn how to make these dynamite bars by reading the recipe below.
Nanaimo Ice Cream Bars
Yield: 40 (1- by-11/2-inch / 2.5- by-4-cm) bars
We are fairly certain that the famed Nanaimo bar originated in Nanaimo, British Columbia. We are also (mostly) convinced that the original bar consisted of a chocolate-wafer crumb base topped with vanilla custard that itself was doused in a chocolate icing or ganache. Beyond that, it is hard to distinguish fact from fiction and folklore. Did local housewife Mabel Jenkins from Cowichan Bay, British Columbia, really invent the recipe in the early 1950s? Or, as some conspiracy theorists insist, did it come into being in the early nineteenth century in Nanaimo? Regardless of where the original recipe came from, we are completely baffled that Nanaimo bars are not more prevalent throughout the United States (and the world). After all, despite being born in Canada, the recipe skews very American in flavor. And, might we add, they are delicious. It is the kind of treat you want to see more often in heavy rotation. Our version of the Nanaimo, the distinctly Canadian dessert, is our ode to Canada Day, of course. Canada Day, by the by, is often referred to as Canada’s birthday, the day three British North American colonies joined together to create the new “kingdom” of Canada. We love Canada. It is like a clean and polite version of the United States, and we visit often (their cooler summers are a great antidote to sticky, stinky August in NYC). These Nanaimo Ice Cream Bars are everything you’d want in July. They are cool, crisp, textured, salty (thanks to the pretzels), and sweet without being obnoxious. True, they are not 100 percent Nanaimo, but we think you will love the ice cream variation. Baked note While we kind of have an addiction to the digestive biscuits—they sound so healthy—often found clustered near other British-type foods in American grocery stores, you can replace them (one for one) with graham crackers. (We find the average digestive biscuits to be slightly less dry than grahams, that is, slightly more pleasing.) Obviously, you can swap ice cream flavors at will, though we prefer salted caramel, mint, vanilla, or coffee; chocolate ice cream on top of all of that other chocolate is a bit much. This recipe includes an uncooked egg, so please exercise caution.
Ingredients:
For the Cocoa Pretzel Crust:
2 ounces (55 g) toasted walnuts (about ½ cup; see page 19), coarsely chopped
5 1/4 ounces (150 g) digestive biscuits or graham crackers (approximately 15 biscuits)
2 1/2 ounces (70 g) thin, salty pretzel sticks 2 ounces (½ stick/55 g) unsalted butter, cut into cubes
1/4 cup (55 g) firmly packed light brown sugar
1/4 cup (20 g) unsweetened dark cocoa powder, such as Valrhona
1 large egg, beaten
1 teaspoon pure vanilla extract
For the Ice Cream Layer:
2 pints (946 ml) homemade or store-bought premium vanilla or salted caramel ice cream
For the Fudge Topping:
2 tablespoons heavy cream
2 tablespoons unsalted butter
1 tablespoon light corn syrup
5 ounces (140 g) dark chocolate (60 to 72% cacao), chopped
Make the Cocoa Pretzel Crust:
1. Line an ungreased 8-inch (20-cm) square pan with parchment paper so that it overhangs by approximately 2 inches (5 cm) on two opposite sides.
2. Place the walnuts in a large bowl.
3. Place the digestive biscuits in a food processor and pulse in three or four short 2-second bursts until the biscuits are finely ground, with a few coarsely ground pieces for texture. Sprinkle the biscuit crumbs over the walnuts. Put the pretzel sticks in the same food processor (no need to wash in between) and pulse five or six times in 1-second bursts to create small sticklike chunks Alternatively, place the pretzels in a zip-tight plastic bag and crush them with a rolling pin. Do not overprocess the pretzels; the pieces should be peanut size, not powdery. Sprinkle the pretzel chunks over the biscuit crumbs and use your hands to toss them together.
4. Place the butter in a large bowl and set it over a saucepan of simmering water (double-boiler method, see page 19), stirring until the butter is completely melted. Remove the bowl from the pan of simmering water, add the brown sugar and cocoa, and stir until combined. Add the egg in a slow stream while whisking. Return the bowl to the pan of simmering water and whisk slowly and constantly until the mixture thickens slightly, 60 to 90 seconds. It won’t thicken up like a pudding, but it should be a smooth mixture that shows whisk marks. Remove it from the heat and whisk in the vanilla. Stir in the dry ingredients until just combined; try to ensure that the dry ingredients are covered by the wet. Turn the crumb mixture out into the prepared pan and firmly press it into an even layer on only the bottom of the pan, not the sides; if you like, use the back of a metal measuring cup to help even it out. Refrigerate the pan for 30 minutes.
Assemble the Ice Cream Layer:
1. Remove the ice cream from your freezer and let it soften, about 15 minutes. Place the ice cream in a large bowl and use a rubber spatula to beat it until it is slightly malleable. Alternatively, beat the ice cream in a standing mixer fitted with the paddle attachment (a chilled bowl and paddle are preferable) until almost smooth but not melty, about 10 seconds. Remove the crust from the refrigerator.
2. Spread the ice cream over the cocoa pretzel crust in an even layer. Cover with plastic wrap and freeze for 2 hours.
Make the Fudge Topping:
1. In a small saucepan over low heat, heat the cream, butter, and corn syrup together until just simmering. Remove the pan from the heat and add the chocolate. Whisk until the fudge is smooth. If you have a few stray unmelted chocolate chunks, reheat the mixture over very low heat until completely melted. Assemble the Bars 1. Whisk the fudge topping vigorously for 1 minute to release excessive heat or until it reaches room temperature. Remove the bars from the freezer and pour the fudge over the ice cream layer. Working quickly, use an offset spatula to spread the fudge topping into an even layer. Again, cover with plastic wrap and freeze until the bars are solid, at least 2 hours and up to 24 hours.
2. Once the bars are completely frozen, remove from the freezer. Dip a knife in hot water and wipe it dry. Using the hot knife, go around the edges of the pan. Gently pull up on both sides of the parchment overhang to release the bars from the pan and place the bars with the parchment on a large cutting board. Freeze the bars on the cutting board for 10 minutes.
3. Remove the bars from the freezer. Dip a knife in hot water and wipe it dry. Using a hot knife, score and slice the bars into 1-by-1½-inch (2.5-by-4-cm) rectangles. (Freeze the bars in between scoring and slicing if the ice cream gets too soft.) Serve immediately.
How to store: The bars will keep, tightly wrapped in foil, in the freezer for up to 5 days. Let the bars sit at room temperature for a few minutes before serving.
Image Sources:


