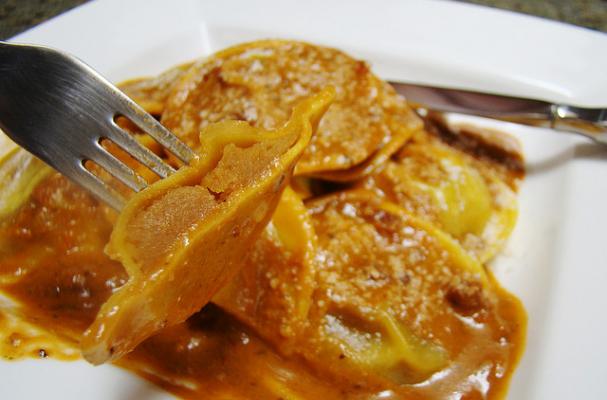
Meatless Monday: Butternut Squash Ravioli with Browned Butter, Sage, and Pine Nuts

September 26, 2011

This is one of my favorite fall dishes.  The sweet butternut squash pairs perfectly with the nutty butter and pungent sage.  Homemade ravioli is a lengthy process but well worth the effort.  Nothing compares to freshly made pasta.  This is a dish you want to take on when you have plenty of time so that imaking ravioli is relaxing and fun.  This is a recipe that you'll definitely want to make this season.

Butternut Squash Ravioli with Browned Butter, Sage, and Pine Nuts

Ingredients:

1 teaspoon olive oil for roasting the squash
2 tablespoons butter
2 smalls large shallots or one onion, chopped
1/4 teaspoon nutmeg
Sea salt & freshly ground black pepper to taste
2 cups flour
2 smalls extra large eggs or 3 to medium-sized eggs
1/2 teaspoon salt
2 teaspoons olive oil or water, as needed
semolina flour to keep things from sticking
 
Directions:
 
Make the filling: Preheat the oven to 375. Cut the squash in half length-wise and scoop out all the seeds and stringy bits. Rub the flesh with olive oil and place cut side down on a heavy cookie sheet. Roast for 30-40 minutes, until fully soft. While the squash is roasting, cut up the onion or shallot and sautee in olive oil or butter until translucent, stir in the crushed dried sage. Once the squash is done and has cooled down enough to handle, scoop the flesh out of the skin and place in a bowl. Add the sauteed shallot or onion mixture, 1/2 cup of grated parmesan cheese (you could skip this if you want to make the ravioli dairy
 
Make the dough: I like to mix the dough on cookie sheets as I have limited counter space and it's also much easier to clean a cookie sheet than it is to get egg and flour out of tile grout or wood. Start by pouring the flour onto the tray, gathering it into a pile, adding the salt, and forming a well in the middle of the flour. Crack the eggs into the well.
 
Incorporate the egg into the flour with a fork. Once the fork tines get clogged, clean them off and begin using your fingers to do the same thing until it's all mixed together, roughly. If you're having a lot of trouble with it (though remember that it should be stiff), you can add a little bit of either olive oil or water to help it stick together.
 
Once the dough begins to stick together, form it into a ball (it will seem to be composed of flakes of dough - that is normal). Now it is time to knead. Use the heel of your hand to push the dough away from you, then fold the flap back towards you and give it a quarter turn. Press down on another section of the dough and do the same thing. The dough will be stiff-textured (much more so than bread dough) and hard to work with. Knead it for 10 minutes (this is where the sweating comes in) or until the dough is smooth.
 
Then pat the dough into a neat ball, cover it with a dish towel or sheet of plastic wrap and let it rest for at least 30 minutes (1-2 hours is even better.) It may not sound important but you must not skip this step -- it's crucial! By this point, YOU will also probably need a little rest, as well as a chance to clean up a bit to get ready for the next step.
 
After the dough has rested long enough (it should be more pliant and easier to work with after its little nap), cut the ball of dough into four pieces. Put three back under the towel or plastic wrap so they don't dry out and flatten the fourth one with your palm or a rolling pin.
 
Clamp the pasta roller to the edge of a table and set the machine so that its rollers are at their widest setting. Feed the flattened ball of dough through the rollers a few times, folding it over each time before you push it through. This will help further knead and smooth the dough. Then begin to feed the dough through on successively narrower settings until you've reached your desired thickness (for ravioli, this will probably be the machine's smallest setting since you don't want the pasta to be too thick.) The dough will get quite long and ribbon-like during this process. You may find that you need an extra set of hands to either "catch" the dough or to turn the crank while you catch it (though you can also do this by yourself, it's just a bit trickier.) Don't freak out if the edges are rough or torn or if the dough is not perfect (it probably won't be). You ca
 
Lay the rolled out ribbon of dough on kitchen towels or on a floured (or semolina-ed) cookie sheet to rest for 5 minutes. Do not let it get too dry, though. You may also need to cut it into two or more pieces in order to fit it on a cookie sheet or towel at this point -- just make sure to match them up in size when you're making those cuts since you will very shortly be using one as the top of your ravioli and one as the bottom.
 
Place your bowl of filling at a convenient spot and make sure you have a small spoon handy. Position your cookie sheet (which should be lightly covered with either flour or semolina to prevent the dough from sticking to it) in front of you and get to work. Lay two roughly equal-sized ribbons of rolled pasta dough on the sheet length-wise. If one is larger, make that one the bottom sheet.
 
Using the spoon, place a dollop of filling at equally-spaced intervals along the bottom ribbon of dough. If the ribbon is tall enough, you should be able to fit two rows of filling on it, if not, just go for one. Be careful not to add too much filling or to place the dollops too close to each other or too close to the edge of the ribbon of dough since you will need adequate space to seal each one and then cut it apart from the others.
 
Once your drops of filling are in place, dip either your finger or a pastry brush (I used my finger) into the bowl of water and wet a grid pattern around each dollop of filling. It is essential to wet the dough thoroughly (though you don't want puddles of water or to make it soggy) around each drop of filling as this is what will make the seal between the bottom and top pieces of dough. An incomplete seal will make a ravioli that is much more likely to explode in the pot while cooking.
 
Once you've finished moistening the bottom ribbon of dough, lift the top piece of dough and position it over the bottom, taking care to match them up as well as you can. Lay the top ribbon of dough carefully over the bottom one, gently pressing each mound of filling with your fingers to push the air out of each pillow before pressing the top strip of dough to the wetted area of the bottom strip to make the seal. Air in the pocket will also cause the ravioli to explode while cooking so you want to avoid that as much as possible (though some casualties are inevitable.)
 
I think this part is the most fun of all! Using your ravioli cutter (you can also use a regular paring knife, the only difference is that the cutter will make those trademark fluted ravioli edges), cut carefully down the middle of each row in both directions to separate them. Be sure to leave equal room on each side and avoid cutting too close to the filling. Place the cut ravioli on another cookie tray that is lightly dusted with semolina so that they do not stick. You can also stack them in layers on pieces of lightly floured parchment paper if you have too many to lay out on the cookie sheets. Ravioli freeze well so I strongly suggest making enough to freeze as this is a pretty time-consuming process and it's nice to have something more than one meal's worth of fo
 

When you're ready to cook the ravioli, boil a large pot of salted water and drop them in, cooking for just 5 or so minutes (remember, they are fresh so they will cook very quickly!) Meanwhile, melt a hunk of butter in a frying pan, add a handful of whole fresh sage leaves (washed and dried) and some pinenuts and sautee for 1-2 minutes. Using a slotted spoon, transfer the cooked ravioli directly from the pot of boiling water to the frying pan and toss to coat. Sprinkle with sea salt and freshly ground black pepper and top with fresh parmesan.

Image Sources:

.